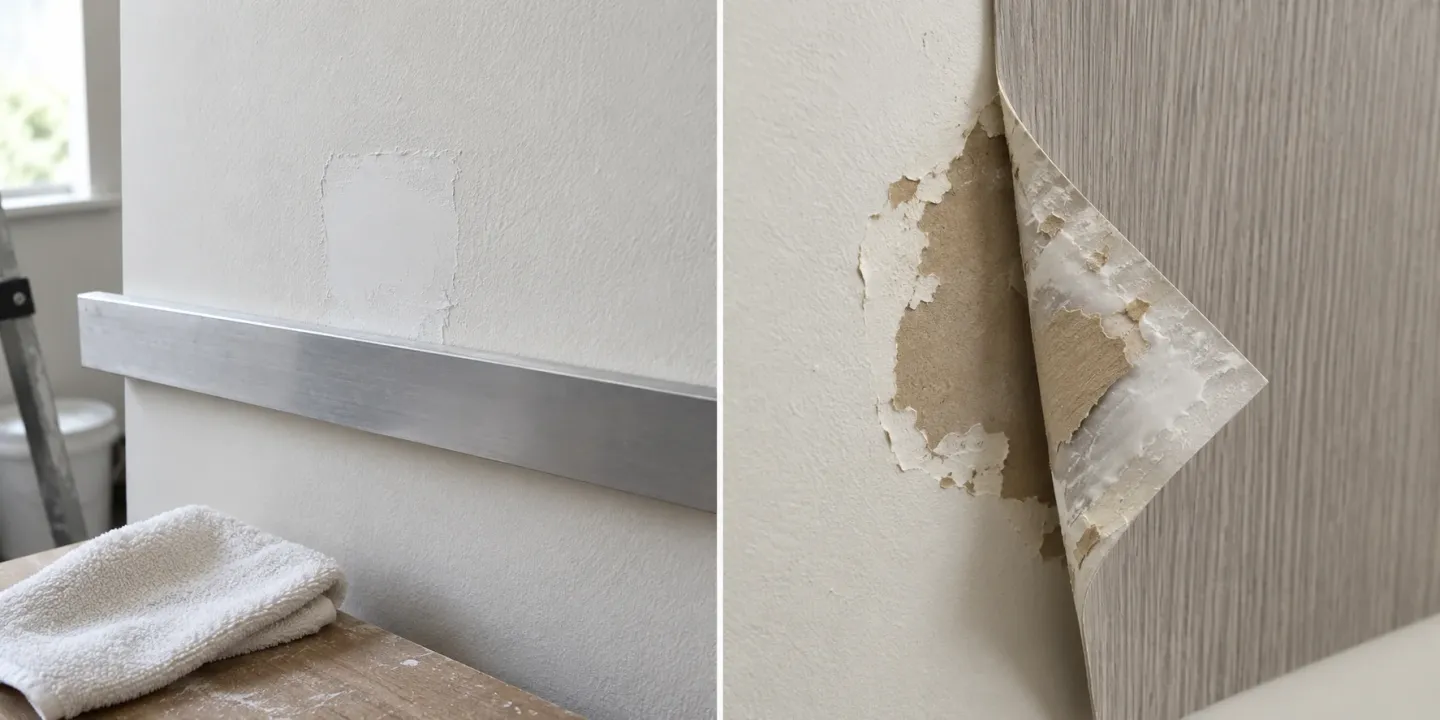
Peel-and-stick wall panels can fail on an unsuitable wall. Check substrate, moisture, heat and fire requirements before buying; use the interior wall finishes guide to compare alternatives and the selected panel’s technical sheet to confirm suitability.
Quick check: is the wall suitable?
Swipe sideways to see the other columns. The first column stays visible.
| Check | Where the answer comes from | Why it matters |
|---|---|---|
| Approved substrates and primers | Panel maker’s technical data sheet | Adhesion depends on the surface; low-energy or glossy coatings resist bonding |
| Paint cure time before application | Paint maker’s data and panel maker’s instructions | Fresh paint can soften or reject the adhesive |
| Installation and service temperature | Panel maker’s technical data sheet | Check the adhesive’s documented temperature limits |
| Wall moisture | Moisture survey of the wall; for slabs only, ASTM F1869 or the method the flooring maker names | Vapour trapped behind an impermeable panel blisters the bond |
| Flatness and texture | Panel maker’s stated tolerance | Rigid panels bridge low spots and lose contact area |
| Fire classification | ASTM E84 / UL 723 or NFPA 286 report for the product as installed, checked against the locally adopted code (IBC Table 803.13; IRC R302.9 in homes) | Required class or limits vary by occupancy, location and sprinklers |
| Removal plan | Panel maker’s removal guidance; lease terms | Adhesive removal can lift paint or drywall paper |
Substrate checks — read vertically. None of these surfaces is approved merely by appearing on this list.
- Painted drywall, sealed plywood or MDF: check that the exact surface, coating and primer are named in the product instructions; confirm soundness, dryness and cure.
- Tile, metal, glass or mirrors: confirm the maker accepts that surface and specifies its cleaning and preparation. A smooth face alone is not approval.
- Glossy paint, light texture, bare plaster or concrete: ask which preparation is permitted and whether the prepared surface meets the product’s flatness and bond requirements.
- Uncured paint, crumbling texture or damp walls: resolve the condition before considering installation; record the product’s required cure and preparation.
- Bathrooms, showers and heat exposure: verify the documented exposure. Direct shower use needs a complete system approved for it; respect appliance clearances. A bathroom is not automatically prohibited or approved.
- Commercial exit routes: check the exact installed product’s fire documentation against the project requirement; the location name alone does not determine a class.
These panels use a pre-applied adhesive behind a release liner. Confirm whether the selected system also calls for additional adhesive or mechanical fixings.
1. Adhesive basics: pressure-sensitive adhesives (PSA)
The bond relies mainly on one of two adhesive families, and the data sheet usually tells you which:
- Synthetic rubber PSAs grab quickly but soften as they warm. Under sustained load from heavier panels they can creep, so panels slide down a vertical wall over time.
- Acrylic PSAs generally need firmer application pressure and time to build full bond, and usually tolerate heat, UV and humidity better. The roller pressure, dwell time and service temperature you can rely on are the figures on the product’s own data sheet; they vary between products.
Surface energy decides whether the adhesive wets the wall at all. Low-surface-energy coatings, such as some stain-resistant or silicone-modified paints, and unprimed plastics resist wetting, and panels on them tend to let go early.
If you want sound absorption rather than decoration, an adhesive panel is usually the wrong tool; see acoustic wall treatments.
Takeaway: Read the adhesive type and limits on the data sheet before matching the panel to a room.
2. Substrate conditions and mechanical limits
Audit the wall against four conditions before specifying panels:
- Flatness. Rigid panels bridge low spots and leave unbonded pockets. Compare the wall against the flatness tolerance the panel maker states, and skim or shim where it is out.
- Paint cure. Do not apply over freshly painted walls. Use the cure time the paint maker states, and any minimum wait the panel maker adds; until then solvents and water are still leaving the film.
- Moisture. Many panel faces and adhesives have low vapour permeability, so on a wall that is wet or has vapour moving through it they can slow drying and trap moisture behind the panel. On basement, masonry and exterior-facing walls, find and fix the moisture source first and confirm with a moisture survey suited to that wall. ASTM F1869, the calcium chloride test, does not apply here: its scope is the moisture vapour emission rate of bare concrete floors, it excludes gypsum concrete and lightweight-aggregate floors, and it sets no wall limit. The often-quoted 3 lb per 1,000 sq ft per 24 hours figure is a pass level some flooring makers set for their floor products, not a wall requirement.
- Texture. Heavy knockdown or popcorn textures cut the contact area sharply. Skim-coat flat and prime with the primer the panel maker approves, or choose one of the textured wall finishes that does not depend on adhesion. Test a sample on the real wall first, as described in material samples and mock-ups.
Common mistake: Using a floor moisture test result, or a floor pass level, to approve a damp wall for panels.
Takeaway: A sound, flat, dry and cured wall matters more than which panel you choose.
3. Wet zones and heat clearances
Two locations are poor candidates for self-adhesive panels:
- Shower enclosures and tub surrounds. A waterproof panel face does not make the wall system waterproof: joints and edges are the weak points, and water that gets behind panels attacks the adhesive and the backing board out of sight. Unless the maker documents the complete system for direct shower exposure, use a wet-area lining system with a membrane instead; see moisture-resistant wall finishes for how those systems are layered.
- Behind cooktops and ranges. Heat weakens PSAs and many panel faces and cores are combustible. Keep panels outside the clearances in the cooktop or range installation instructions and the requirements of the local code; there is no single safe distance that applies to every appliance.
Takeaway: If water or appliance heat reaches the wall, choose a finish system designed for it.
4. Fire performance and the building code
Interior wall finishes are regulated in homes as well as in commercial buildings. Where the International Residential Code is adopted, IRC Section R302.9 generally limits wall and ceiling finishes to a flame spread index of 200 or less and a smoke-developed index of 450 or less, with listed exceptions; foam plastics have their own residential provisions. In commercial, hospitality, multi-family and exit-route spaces under the IBC, interior wall finishes are regulated under IBC Chapter 8:
- Test method. Wall finishes are classified from ASTM E84 or UL 723 surface-burning tests. The IBC also allows NFPA 286 room-corner testing as an alternative path where its acceptance criteria are met. Test results apply to the product as tested and mounted, so check that the report covers your substrate and adhesive.
- Classes. Class A is flame spread index 0–25, Class B is 26–75 and Class C is 76–200, each with a smoke-developed index of 450 or less.
- Which class is required. IBC Table 803.13 sets the minimum class by occupancy group, by location (interior exit stairways and exit passageways, corridors, or rooms and enclosed spaces) and by whether the building is sprinklered. The same corridor can need a different class in a different occupancy, or once sprinklers are added. Check the edition and local amendments your jurisdiction has adopted.
- Foam cores. Foam plastics used as interior finish face additional restrictions in IBC Chapter 26. Ask the supplier for the test report covering the exact panel, core and thickness, not just a marketing claim of “fire rated”.
Common mistake: Assuming every exit corridor needs Class A, or that a Class C rating is acceptable in every room. Commercial interior wall materials compares finishes for these spaces.
Takeaway: Get the product’s fire test report for the way it will be installed and match it to the code requirement for your occupancy, location and sprinkler status.
5. Removal and substrate damage
Self-adhesive panels can damage drywall on removal. Check the maker’s removal guidance and allow for paint or paper-face repairs rather than assuming damage-free removal. For rentals and tenant fit-outs, compare a mechanically fixed system’s release method and the holes its fixings leave; check what the lease allows. For other wall finishes, see wall panels vs plaster and feature wall materials.
Takeaway: If the wall has to be returned in good condition, plan removal and repair before choosing an adhesive panel.
When this does not apply
- Exterior walls and facades: peel-and-stick interior panels are not cladding; see exterior wall cladding materials.
- Fire-rated assemblies and exit routes where the authority having jurisdiction requires documentation the supplier cannot provide.
- Products installed with a mechanical fixing or a separately applied adhesive; follow that system’s instructions.
Related reading
- Textured wall finishes — options for walls too rough for adhesive panels.
- Material samples and mock-ups — test adhesion and appearance on the real wall before ordering.
- Material durability and maintenance — how finish choices age in service.
Revision record — 8 October 2026: Replaced the rigid substrate graphic with product-dependent checks and a preparation/removal illustration. The 7 October technical correction clarified that ASTM F1869 concerns bare concrete floors, not walls, and that fire requirements depend on the applicable code and project conditions rather than a universal class for each room type.
Frequently asked questions
Are peel and stick wall panels good?
They are good for low-risk interior refreshes on smooth, sound, dry and cured walls where the product's data sheet covers the substrate and room conditions. They are a weak choice for showers, damp or uneven walls, areas near cooking heat, and commercial spaces where the finish class has to be documented.
How to install peel and stick wall panels?
Clean and dry the wall, repair and prime it as the panel maker specifies, let fresh paint cure for the period the paint and panel makers state, dry-fit and mark a level line, peel the liner progressively and press the panel firmly over its whole face with a roller. Follow the data sheet for temperature during installation and for how long the adhesive needs to build bond.
What are the different types of peel and stick wall panels?
Common types include foam-backed PVC or polyethylene tiles, thin wood or wood-veneer slats, flexible stone or mineral veneers, and decorative vinyl-faced boards. They differ in weight, rigidity and core material, which changes both how well the adhesive holds and which fire test data you need.
What are the applications of peel and stick wall panels?
Typical uses are feature walls, headboard walls, display areas and low-traffic interior rooms, and short-term refreshes in rentals where the landlord allows them and removal damage has been planned for. They are not a substitute for waterproof wet-area linings or for a tested finish in exit routes.
What are the downsides of using peel and stick wallpaper?
Several limits are shared with thicker panels, though wallpaper is lighter and its adhesive differs. Adhesion depends on the paint and substrate, textured walls reduce contact, humidity and heat weaken the bond, and removal can lift paint or drywall paper.
What are common mistakes with peel and stick wallpaper?
Applying over paint that has not cured, skipping cleaning and priming, sticking to textured or glossy surfaces without the prep the maker requires, installing in a shower or inside appliance clearances the product is not approved for, and assuming the product can come off without damaging the wall.
Sources
- ASTM E84-23: Standard Test Method for Surface Burning Characteristics of Building Materials — ASTM International Accessed October 6, 2026.
- PSTC 101: International Standard for Peel Adhesion of Pressure Sensitive Tape — Pressure Sensitive Tape Council Accessed October 6, 2026.
- ASTM F1869-16: Measuring Moisture Vapor Emission Rate of Concrete Subfloor Using Anhydrous Calcium Chloride — ASTM International Accessed October 7, 2026.
- 2021 International Residential Code, Chapter 3: Building Planning (Section R302.9) — International Code Council Accessed October 7, 2026.
- 2021 International Building Code, Chapter 8: Interior Finishes — International Code Council Accessed October 7, 2026.