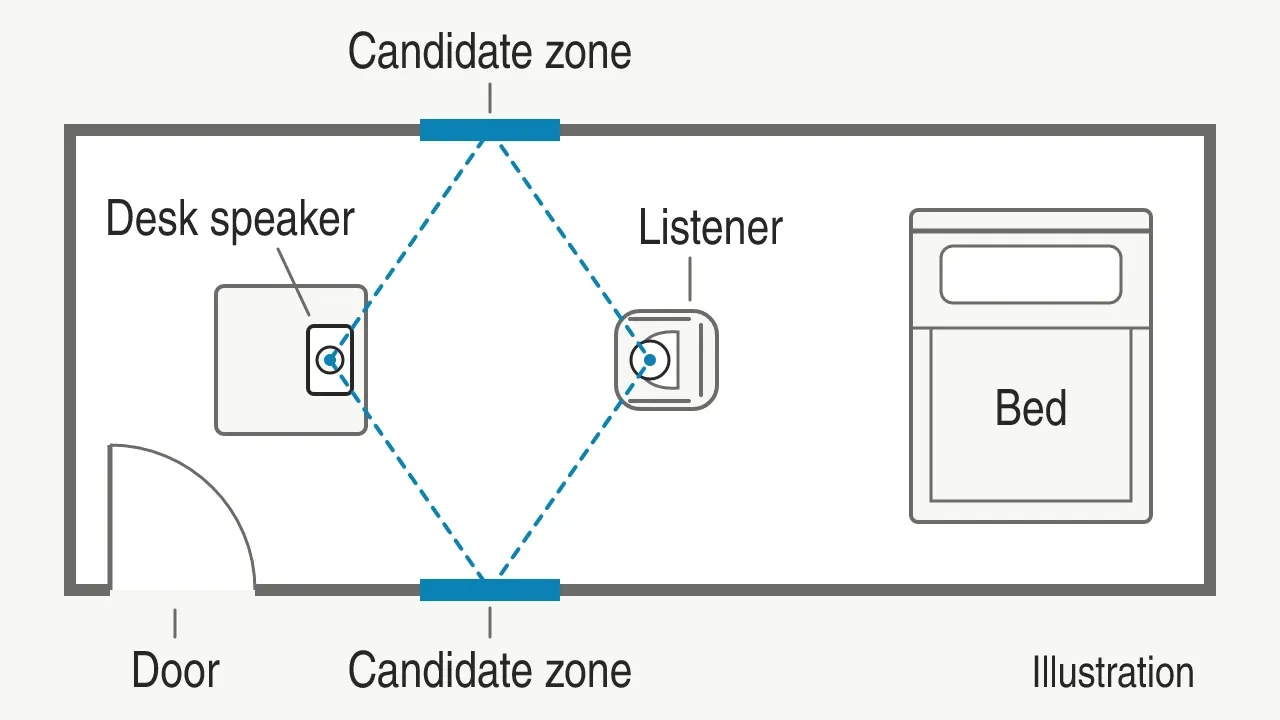
Panels on the wrong wall can waste usable space while leaving the intended reflection path untreated. Place acoustic panels by locating the sound source and the position where you listen or work, then check the available surface and mounting before settling the layout. This guide covers bedrooms and offices with an indoor reflection problem; use the distinction between absorption and sound isolation first if the noise comes from outside the room.
Swipe sideways to see the other columns. The first column stays visible.
| Input or item | Typical value or source | Why it matters |
|---|---|---|
| Sound task | Your description: desk listening, calls or general room echo | Defines what the placement is meant to improve |
| Source and occupied positions | Furnished room sketch and normal working posture | Locates the reflection paths being considered |
| Usable surfaces | Wall elevations with doors, windows and fixtures | Separates a candidate zone from an installable one |
| Coverage record | Actual panel dimensions and a named area denominator | Prevents an area percentage becoming a guessed requirement |
| Acoustic evidence | Exact product report, including mounting and frequency data | Identifies the construction represented by the result |
| Attachment and removal | Product instructions, wall condition and alteration permission | Determines whether the proposed installation can proceed |
What sound are you trying to change?
Write down a room task before marking panel positions. “Quieter bedroom” could mean less echo during a call, clearer desk listening, or less sound from the corridor. Only the first two belong to this placement exercise. A pleasing panel pattern cannot establish that it addresses the sound path that bothers you.
Swipe sideways to see the other columns. The first column stays visible.
| Room use | First item to record | Placement question |
|---|---|---|
| Bedroom used mainly for sleep | Where the disturbing sound originates | Is this an indoor reflection problem at all? |
| Bedroom with desk speakers | Speaker locations and usual seated position | Which nearby surfaces return sound to that position? |
| Bedroom or private office used for calls | Person, microphone and ordinary seating arrangement | Which room surfaces are candidates for an absorption layout? |
| Shared office | Occupied work areas and activities | Is the brief about room echo, speech carrying, or privacy? |
These are planning questions, not measured diagnoses. Save a sketch with the furniture in its normal position. Note whether the problem happens while the room is occupied, rather than relying on how it sounds empty. Then identify which family of interior finish can be coordinated with the intended treatment.
Takeaway: Give the layout a specific indoor sound task before choosing a wall.
Where should panels go in a bedroom with a desk?
For a fixed speaker setup, start by mapping candidate early reflection zones on the side walls and noting the ceiling as a separate possibility. Use the position in which you actually listen. The wall behind the headboard may suit the decoration, but its relevance to the desk depends on the room geometry.
GIK Acoustics describes a mirror method: sit at the listening position while a helper moves a mirror along the wall; where the speaker becomes visible is a candidate reflection point. Its guidance also stresses zones rather than isolated dots. Here is how to record that observation without turning it into a universal room plan:
- Put the speakers and chair in their intended working positions.
- Stay in your ordinary seated posture while the helper moves the mirror along each accessible side wall.
- Mark the location for each speaker, then repeat for another listening position you regularly use.
- Draw a candidate treatment zone around those marks and note anything that obstructs installation.
- Compare a panel’s usable face with that zone, keeping its documented construction alongside the drawing.
The mirror exercise identifies a geometric path; it does not measure the reflection’s strength or certify the required panel area. For calls without loudspeakers, use a surface survey rather than copying a speaker-based mirror plan. As an editorial planning aid, mark the normal speaking and microphone positions, outline the surrounding hard surfaces, and note doors, furniture and other installation obstacles. For each candidate area, write which activity it would serve and what a room assessment still needs to establish. This survey does not rank reflection strength or determine panel quantities. A ceiling candidate also needs its own installation detail.
For a ceiling candidate, the acoustic ceiling panels and baffles guide adds an RT60 absorption budget and coordination with lights, diffusers and sprinklers before quantities are fixed.
Check acoustic panel constructions and their test reports before matching a decorative panel to a marked zone. Keep wardrobe access, curtains and the door swing visible on the plan. Where appearance matters, use the feature-wall design principles to align joints and edges after identifying the acoustic task.
Common mistake: Copying the illustrated bedroom plan without recording your own desk, speakers and chair. The drawing shows a reasoning process, not a prescribed position behind every bed.
Takeaway: Map the actual listening arrangement, then turn reflection marks into installable candidate zones.
What changes when the room is an office?
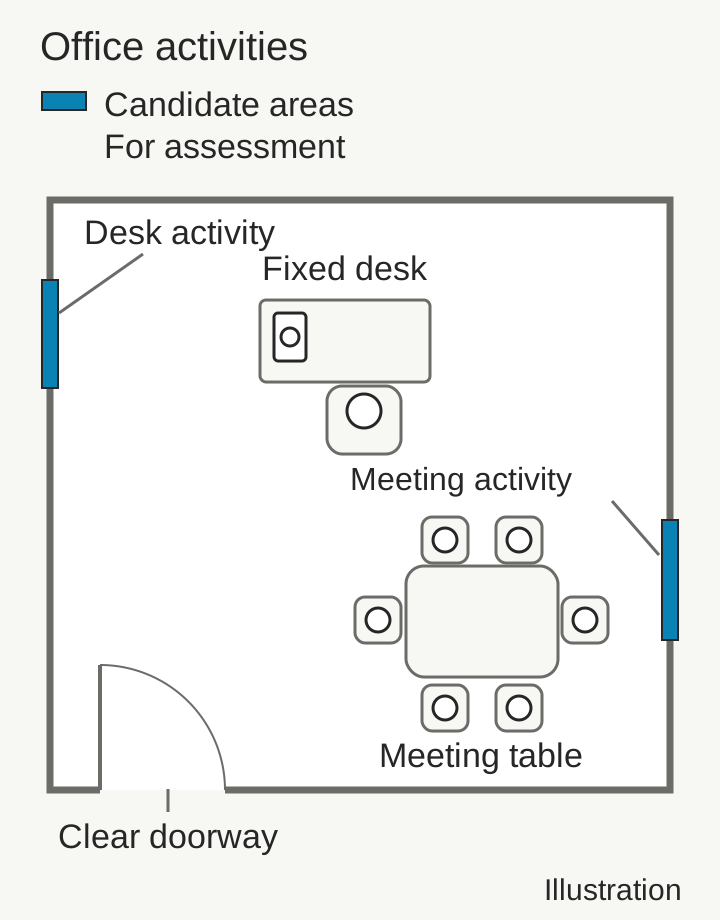
A private office with fixed speakers can use the same geometric exercise; a shared office needs a brief covering its different occupied positions. Do not choose a single desk as the reference for everyone. Record work areas, meeting activity and surfaces that are available for treatment before choosing a wall or ceiling layout.
Swipe sideways to see the other columns. The first column stays visible.
| Office arrangement | Record on the sketch | Decision to resolve |
|---|---|---|
| Fixed desktop listening | Speaker pair, chair and nearby surfaces | Map reflection zones for that setup |
| Calls from a changing position | Normal speaking and microphone positions | Decide which use the treatment brief should prioritise |
| Meeting table | Occupied seats and available room surfaces | Assess the room rather than copying one speaker reflection point |
| Open work area | Desks, circulation and conversations across zones | Separate absorption from the privacy and layout questions |
Use the same surface-survey record for calls and shared conversation: mark speaking and receiving positions, identify surrounding hard surfaces, and note installation obstacles. As an editorial planning aid, associate each candidate area with a specific activity and an unresolved assessment question, such as whether it contributes to the reflection concern at the meeting table. Include furnishings that will stay and any ceiling option needing further design. The diagram links candidate areas to activities for assessment; it does not rank reflections or prescribe treatment. For a shared workplace with a specified acoustic outcome, pass that survey to an acoustician before approving quantities.
Takeaway: An office layout needs the occupied positions and activities, not just its floor dimensions.
How much wall should you cover, and what can a calculator tell you?
Record the panel area you propose, but do not assign a universal coverage percentage. The quantity needed for an acoustic outcome requires room and product evidence. A calculator that accepts only floor area can give an area estimate under its assumptions; it cannot establish the mounting, useful locations or finished room performance by itself.
For a geometry record, measure in consistent units:
- Rectangular panel face area = panel width × panel height.
- Panel face area within the stated wall scope = sum of the actual panel faces on those walls.
- Wall coverage (%) = panel face area within the stated wall scope ÷ stated wall area × 100.
The last expression is the definition of a percentage, not an acoustic design formula. If the denominator is net wall area, define it as the wall area after subtracting the openings you list. For one selected wall, count only the panel faces on that wall in the numerator. For all room walls, count only the panel faces on those walls. Apply the same named wall scope to both parts of the fraction. Record ceiling panels separately, and do not mix ceilings or freestanding screens into wall coverage. A percentage of all room surfaces, one wall or the floor describes a different quantity in each case.
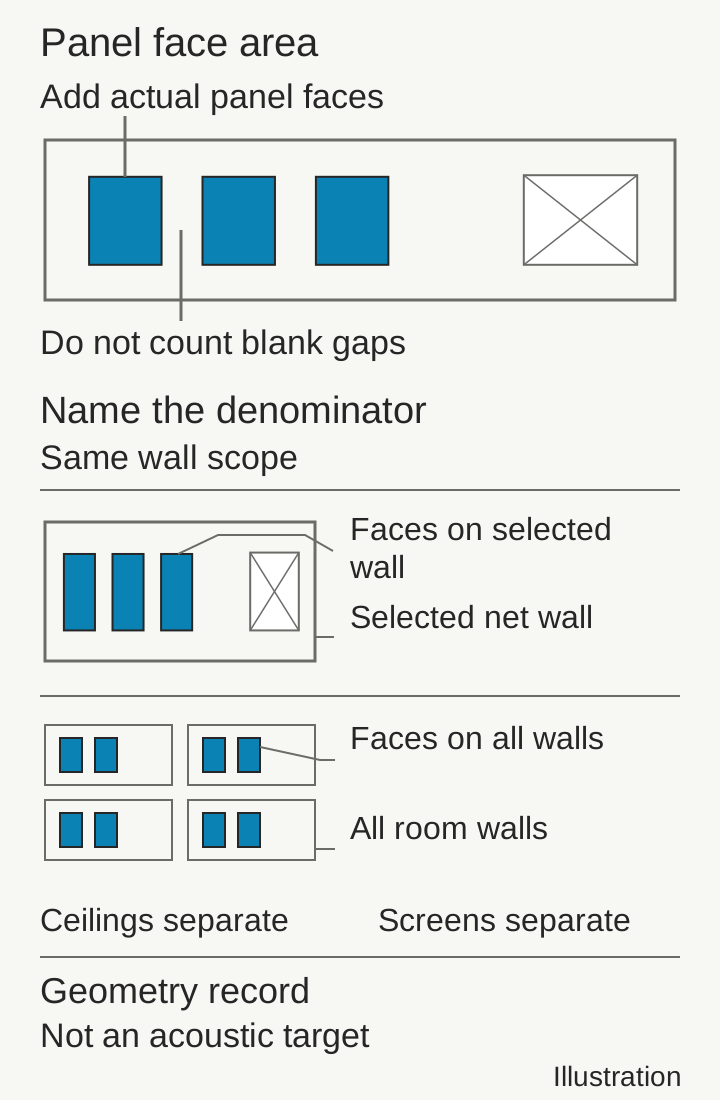
Do not count the blank gaps between separate panels as treatment. For a composite slat panel, record its overall product face rather than manually treating every visible opening as a separate tested absorber. Its laboratory data belongs to the complete specimen. Also keep a freestanding screen’s published absorption measure separate from this wall-face arithmetic; ISO 354 distinguishes surface coefficients and equivalent absorption area for objects.
Your record needs three separate entries: proposed panel face area, available installation area, and acoustic target with its source. Leave the target unresolved until a project assessment supplies it. A clap or ordinary listening comparison can help you describe a concern; it is not a calibrated verification of a reverberation-time requirement.
Common mistake: Taking a percentage from a floor-area calculator and calling it wall coverage. Ask what the denominator and performance assumptions actually are before using its output.
Takeaway: Use area arithmetic to document a proposal; obtain the treatment target from an assessment of the room.
Why does mounting belong beside the absorption result?
The mounting is part of the test arrangement, not a detail to decide after selecting a rating. ISO 354:2003, clause 6.2.1.3, places plane absorbers in specified mountings or the arrangement required by the producer or intended application. Match that documented arrangement before using its coefficients for your proposed installation.
The same standard’s clause 3.8 notes the enclosed area for specimens surrounded by Type E or Type J structures. Those are laboratory descriptions, not an instruction to add an arbitrary gap behind a bedroom panel. Read the actual report for backing, construction depth, frame and edge conditions; a label alone does not describe the whole specimen.
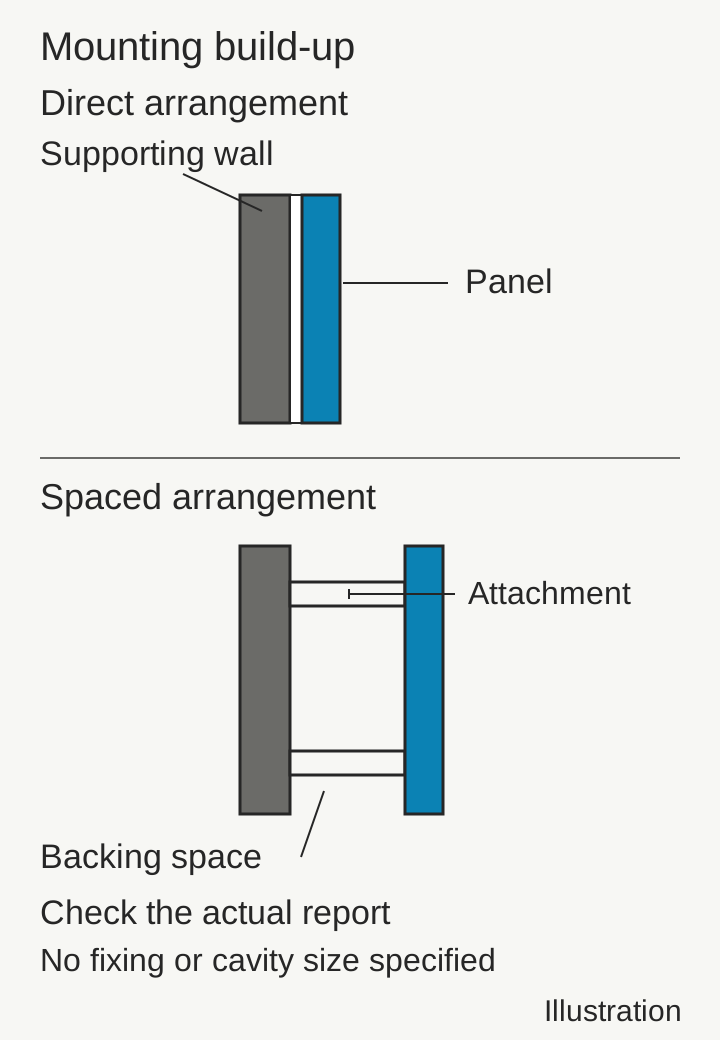
If the report includes a backing space and the installer plans to glue the panel flat, the report no longer describes the proposed build-up. Ask for evidence for the revised arrangement or retain the documented one. Conversely, adding spacers to a direct-mounted product does not establish a new absorption rating. This guide supplies no numerical improvement or universal air-gap size.
Keep these report fields with the drawing: exact product, thickness, face and backing, mounting description, depth definition, exposed edges, frequency-band results and report date. Use the substrate comparison for panel and plaster finishes to separate the wall’s condition from the finish placed on it.
Takeaway: Changing the backing space means checking a different construction, rather than inheriting the original rating.
Should you use adhesive, mechanical fixings or a separate stand?
Choose an attachment only after checking the panel’s instructions, supporting surface and permission to alter the room. Removability and acoustic configuration are separate checks. A mechanical fixing still needs a suitable support; an adhesive still needs compatible surfaces. This comparison identifies what to confirm, without supplying a generic fastening detail.
Swipe sideways to see the other columns. The first column stays visible.
| Proposed arrangement | Supporting surface to confirm | Removal question | Acoustic evidence question |
|---|---|---|---|
| Direct adhesive attachment | Panel backing, wall finish and permitted adhesive | What comes away with the panel, and what needs repair? | Does the report describe this direct build-up? |
| Mechanical rail, clip or bracket | Panel connection and the wall or framing carrying the load | Can the panel detach, and what fixings remain? | Does the support preserve the reported depth and backing? |
| Separate stand or screen | Complete panel-and-stand system and its instructions | Where will it be stored and moved? | Is the evidence for a wall panel or for an exposed object? |
Use the manufacturer’s detail for the exact panel, orientation and supporting wall. Record the complete assembly weight and leave the fixing selection to the responsible installer; this page gives no universal screw count or load rating. Check hidden services before any penetration and keep electrical fittings accessible.
The substrate-first approach to interior finishes is useful here: identify the existing surface and its condition before specifying an attachment. If removal matters, use a material sample and realistic mockup to check the proposed edge, fixing access and removal procedure in an approved test location. A small successful trial still does not certify an entire installation.
Takeaway: Decide attachment, removal and tested build-up together, using product-specific instructions.
How can you assess a no-drill installation?
Treat “no drilling” as a constraint, not as approval for any adhesive or hanging strip. Check both bonded surfaces, the exact hanging system and the intended location. If those instructions exclude the installation, choose another arrangement. A removable connection also needs a usable release path after the panel is installed.
For example, 3M’s Command Picture Hanging Strips instructions exclude hanging over beds, wallpaper, and paper or soft surfaces on the frame. These restrictions are specific to that hanging system; a lightweight acoustic panel is not automatically an approved picture frame. Check the panel side as well as the wall, and do not convert a package weight limit into permission for another application.
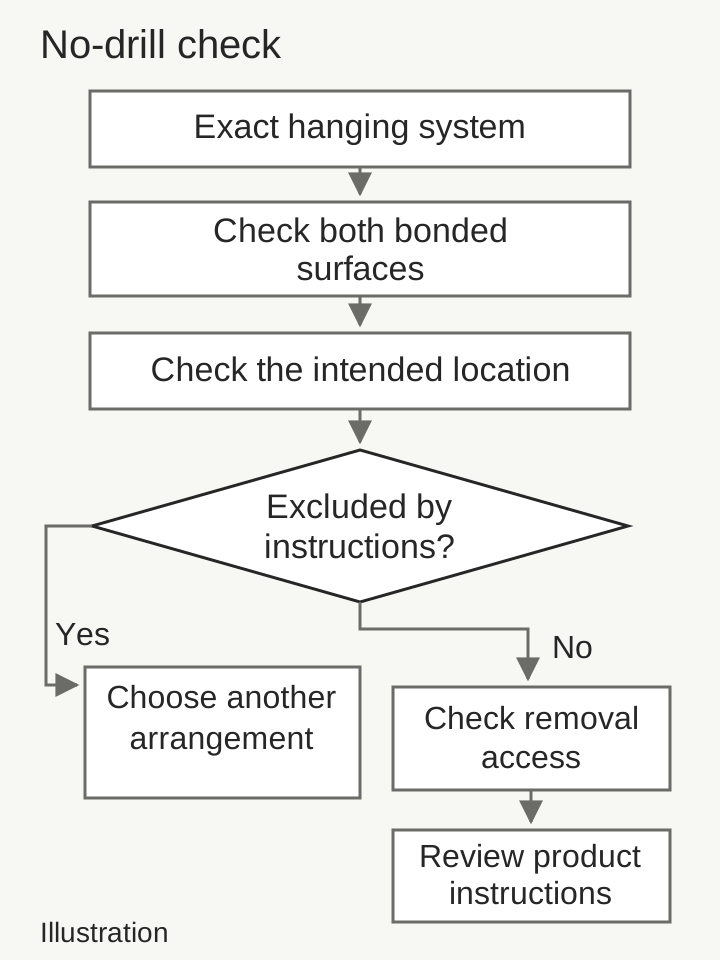
A purpose-made freestanding system is a candidate when the wall cannot be altered. Check its stability instructions and the room’s available space before treating it as the solution. Avoid improvising a suspended panel with generic strips. If a ceiling zone matters, obtain a ceiling-specific system and installation review.
The peel-and-stick wall-panel guide explains why adhesive finishes require their own surface and exposure checks. It does not approve an adhesive fixing for acoustic panels. Keep a written record of the owner’s alteration permission, expected repairs and removal method before work starts.
Takeaway: No-drill mounting needs approval for the surfaces, object and location, plus access to remove it.
When this does not apply
This is an initial planning guide for indoor absorption treatment, not a project acoustic design. It does not specify sound isolation, a multi-seat home theatre, specialist recording conditions or low-frequency treatment. Those tasks need their own criteria and assessment; the mirror diagram and area record do not replace them.
Do not use the mounting table to approve a suspended installation, regulated office finish or structural attachment. Resolve a damp or deteriorating wall before covering it. Keep required access, doors and ventilation clear. Where a project requires acoustic, fire or other compliance evidence, the relevant professional and installer need to review the actual system.
Takeaway: Stop at the scope boundary when the task needs a performance design or installation approval.
What should your finished placement record contain?
Finish with a record that another person can review, rather than a shopping list of panels. The drawing should locate the task, proposed treatment and mounting together. Keep unresolved items visible: an unknown wall construction or missing mounting report is a decision to resolve before installation, not a reason to fill the gap with an assumption.
Swipe sideways to see the other columns. The first column stays visible.
| Record item | What to write or attach | What it enables |
|---|---|---|
| Room task | Describe the indoor reflection concern and normal use | A reviewer can assess the intended outcome |
| Furnished plan | Sources, occupied positions and candidate zones | Placement can be checked against actual activity |
| Area schedule | Actual faces, available surfaces and named denominator | Quantities can be audited without implying a target |
| Target source | Assessment or unresolved project requirement | The area proposal stays separate from performance |
| Product evidence | Complete specimen and mounting description | The proposed build-up can be compared with the report |
| Attachment record | Supporting wall, product detail, permission and removal | The installer can resolve the fixing and repair scope |
Review that record in order: task, candidate zones, available area, acoustic evidence, then attachment. If something changes, update the affected drawing and evidence entry together. That is the practical next step this page supports; it does not provide design services or approve the finished room.
Takeaway: Keep a reviewable layout and evidence record before finalising the installation.
Method and sources
This is an editorial synthesis of public sources, accessed on 8 October 2026. We read the original ISO 354:2003 excerpt, including clauses 3.8, 6.2.1.3 and 6.2.2.2, rather than relying on a catalogue’s generated summary. The excerpt supports the test-arrangement distinctions above; we do not reproduce or claim to have reviewed the complete mounting annex.
GIK Acoustics supplies the mirror method and reflection-zone explanation as manufacturer technical guidance. 3M supplies the restrictions for its own hanging strips. The tables and diagrams are our explanatory planning aids, not experimental results. We did not test a bedroom, assess an office, measure a panel or load-test a fixing.
The FAQ questions were recorded in US English search-result research on 6 October 2026. They identify reader concerns; they do not provide evidence for technical answers. No universal coverage percentage, acoustic improvement, fixed cavity size or damage-free removal promise is inferred from those questions.
Frequently asked questions
Do acoustic panels cause damp?
This guide does not establish that panels cause damp or prevent it. If the wall is stained, damp or has a recurring condensation problem, investigate it before covering the surface. Record access for inspection; a concealed cavity is not evidence that the underlying moisture problem has been resolved.
Where should acoustic panels be placed?
Begin with the actual sound source and occupied positions. For fixed desk speakers, use the mirror exercise to record candidate early reflection zones; for calls and shared conversation, survey nearby hard surfaces and record the activity each candidate area would serve. Check available space and the documented mounting before finalising the layout. These records identify candidates, not a measured treatment design.
What are the best sound proof panels for bedrooms?
A product described as soundproof needs evidence for the sound-isolation task, rather than only an absorption rating. If the problem is a neighbour or corridor, first separate transmission from reflections within the bedroom. This page plans absorption treatment and does not rank products or specify an isolation retrofit.
What are some common problems with acoustic panels?
A useful inspection asks whether the desk moved after placement, whether the installed backing matches the report, and whether removal access was lost behind furniture. Compare the installation with the recorded plan before buying more panels. These are checks to perform, not reports of failures we observed in homes.
What are some creative ideas for acoustic wall panels?
Align candidate treatment areas with an existing wall plane, joinery edge or repeated panel module, then mock up the joints and finish. Keep the identified acoustic area visible on the drawing while changing its appearance. Artwork and colour choices still need to belong to the documented product and finish.
What to use instead of acoustic panels?
Review the furnishings and room arrangement already in place before deciding on more wall treatment. Furniture and other objects form part of the acoustic environment, but an untested soft furnishing is not a substitute for a documented absorber in a performance calculation. Record the proposed change and reassess the actual task.
Sources
- ISO 354:2003 original standard excerpt: specimen area and mounting — ISO / CEN, public standard text via iTeh Accessed October 8, 2026.
- Early Reflections Explained: reflection zones and the mirror method — GIK Acoustics Accessed October 8, 2026.
- Command Picture Hanging Strips: application and removal restrictions — 3M Accessed October 8, 2026.